Creating and developing a theme in WordPress can be very simple if you have some knowledge of HTML, CSS, and JavaScript. Despite this, some beginners can also complete this mission with the right instructions. You just need to have a properly configured development environment and the CMS (Content Management System) installed.
WordPress is one of the most widely used open-source content management systems in the world — around 34.7% of all websites run on it. It has site-building tools and allows you to add various features through plugins and other resources that customize the layout, increase performance, and guarantee a qualified experience for your audience.
In this article, we show you the first steps to create a WordPress theme so that you can have a website with a unique look. Check it out:
What Are The Requirements to Create a WordPress Theme?
To create a WordPress theme, you must have a development environment configured with Apache, PHP, MySQL, and WordPress installed. You can download WordPress from the official website — you must update the database credentials.
You also need to know the structure of the theme. Basically, a WordPress theme is a normal page, created in HTML and, like any other, is formed by the following files:
- header.php: stores the header code;
- footer.php: stores the footer code;
- sidebar.php: location where the buttons added on the side of the page are configured;
- style.css: controls the visual presentation of the theme;
- index.php: incorporates the settings displayed on the home page;
- single.php: contains codes that show the article on its page;
- page.php: contains codes that show the content of a single page;
- archive.php: displays the list of articles that are in the archive, the categories created by the user;
- functions.php: location where some functions add more functionality to themes, such as the logo, menus, color, thumbnails, scripts, and stylesheets;
- 404.php: error code that shows that the requested file was not found.
In addition, you will need to integrate some Bootstrap settings to customize your template. In this article, we will teach you the first steps to this customization.
What Are The Main Steps to Create a WordPress Theme?
Below are the steps for you to create a WordPress theme until it can be customized.
1. Create a folder to store the files you will add
If we are going to build a new theme, we need to know where its files will be in your local installation. This is pretty easy.
We know that a WordPress installation usually has a root directory, also called wordpress. In this directory are the files and folders that we will show below.
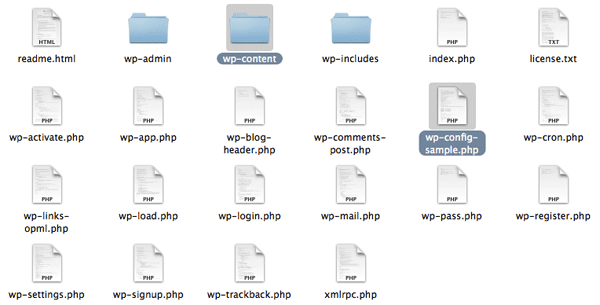
Files
- composer.json
- index.php
- license.txt
- readme.html
- wp-activate.php
- wp-blog-header.php
- wp-comments-post.php
- wp-config.php
- wp-config-sample.php
- wp-cron.php
- wp-links-opml.php
- wp-load.php
- wp-login.php
- wp-mail.php
- wp-settings.php
- wp-signup.php
- wp-trackback.php
- xmlrpc.php
Folders
- wp-admin
- wp-content
- wp-includes
The folder we are looking for is wp-content, where themes and plugins are stored. Inside, there is a folder called themes, which must contain all your WordPress site’s themes, including the one you will create so that the CMS recognizes the new settings.
In the themes folder, three other native folders are already stored, which contain three standard themes, provided by WordPress. In addition to them, you must create another folder, which you can name as you wish.
Let’s say the folder is named customtheme. From that point, the new WordPress theme will be created.
It is essential that your new theme is inside the “themes” folder. That way, it’s possible to activate it and use it online.
2. Create the style.css and index.php files
Every WordPress theme has a series of mandatory files to work properly. In your new folder within Themes, create two files:
- style.css — WP demo file used to inform the author’s name, repository, and theme version;
- index.php — main file, through which WP loads the posts that will be displayed on the screen. In addition, it’s used by WP whenever a WP base file is missing.
style.css
Style.css is a declarative and necessary CSS file for all WordPress themes. It controls the presentation — visual design and layout — of the website pages. That is, in this file, you will specify information about the theme: the theme’s name, author, author page, and version number (in this case, since we are not updating a theme and, instead, creating one from scratch, you can assign it version 1), for example.
This information needs to be written in a standardized way so that WP can identify it, as specified below:
/ *
Theme name: name of the theme (this name will show up on the list);
Theme URI: the website that can be created to demonstrate the functionalities of the theme, it can also contain a form for people to be able to buy it;
Author: write your name, so people can contact you if they are interested in your theme;
Author URI: if you have your own website, you can add it to this line of code;
Github Theme URI: it’s interesting to add the theme on Github so that users can add new features, suggest improvements, and answer questions in that collaborative environment, for example;
Description: add information about the theme, if it’s suitable for a specific type of business, blog, e-commerce, etc.;
Version: 1.0.0.;
Text domain: it’s important to translate the theme into other languages.
* /

index.php
This file is responsible for listing all of the blog’s posts. You need to use native WP functions to show them on the screen. Developers are used to connecting databases and making queries to get the content and display it but, in this case, there are already native functions in WordPress.
Create the index.php file and type anything on the command line, just to see if it will appear in your theme when you activate it.
<h1>Hello world!</h1>
or
<h1>Custom Theme!</h1>
3. Activate the theme in the WordPress dashboard
Access the WordPress Dashboard, click on “Appearance”, then on “Themes”, and check if the created theme is among the displayed options.
Click on “Theme Details” to check if the information entered in the style.css file works correctly.
Click on “Activate” to have the new theme activated by WP and then visit the website to check if the settings have been implemented.
4. Change the index.php file settings
Go back to the index.php command line and delete the text you just wrote to check if your theme works. Now, you must write a command line for WP to fetch the posts from the database and send them to the page.
The goal is to recover the title of the post and its content so that all files can be viewed on the home page.
The “have_posts” command tells WP that it must search the database for blog posts. If there are posts, it will be displayed on the page. If not, it will show the message we wrote in the code for the negative response condition (false).
There is a function called “the_post” that must be added to the whiledo loop “have_posts” so that WP displays that file whenever it identifies it as true for the “have_posts” condition. Through this loop, WordPress checks for posts and displays them on the page as needed.
In practice, it works as follows: if there are posts in the database, all commands inside the loop will be executed for all post files found, and while they are found. Otherwise, the WP informs the user that there are no posts. See the code below:
<?php
if ( have_posts() ) :
while ( have_posts() ) : the_post(); ?>
<h2><a href=”<?php the_permalink() ?>”><?php the_title() ?></a></h2>
<?php the_content() ?>
<?php endwhile;
else :
echo ‘<p>There are no posts!</p>’;
endif;
?>
Note that two functions are used in their most basic form in this loop: “have_posts” and “the_post”. The “have_posts” function informs you if there are any postings in the database to repeat. This function will return true or false: if it returns true, there are posts available to display. If it returns false, there are none.
The “the_post” function retrieves the most recent post and performs the necessary configurations so that it’s displayed chronologically on the theme page. As this happens in a loop, whenever there is a new post, it will be added automatically if the function returns true.
The “the_content” function attaches the content to the file title inserted on the page. The “the_permalink” function matches a link to each individual post so that the user can access the content on their own and without the full text being displayed on the home page.
If you want to add a brief summary under the file title, with the first 200 characters of the content, just insert the “the_excerpt” function in place of the “the_content” function. Thus, the user only has access to the full text when clicking on the link.
In this case, you will have to create a new file in your theme’s folder, similar to “index.php” (even with the same line of code, just copy and paste the index.php loop and change the “the_excerpt” function to “the_content”).
5. Add header and footer
The next step is to create new files in the same folder as your theme, where you added the files style.css and index.php. They are called header.php and footer.php.
It’s good practice to always include wp_head in your themes, as this is a special function that finalizes the output in the <head> section of your header.php file. It should be used before the closing </head> tag, mainly to facilitate the addition of plugins to the site, which can rely on this hook to add styles, scripts, or meta elements to the <head> area.
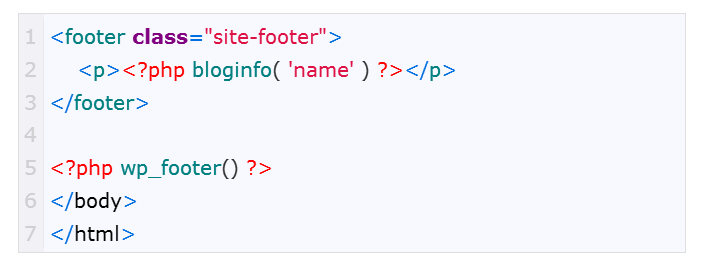
Footer.php
The footer.php file can close the tags used in the functions, as described below:
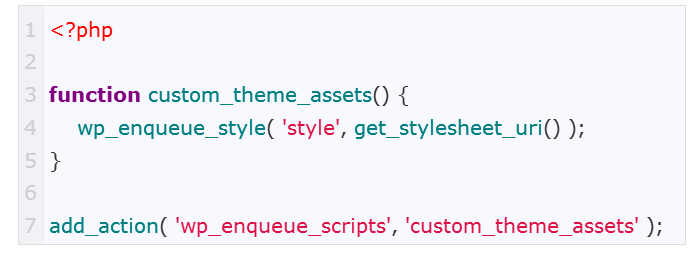
6. Create the functions.php folder
At this point, four file folders were added to the custom theme: index.php, style.css, header.php, and footer.php. The next file you should create is called functions.php, which adds personality to WordPress since its command-line can modify the default behavior of the CMS. It has the following characteristics:
- does not require unique header text;
- works only when in the activated theme directory;
- applies only to the current theme;
This code will include or activate the stylesheet for your custom theme:
What Else Should You Know to Create a WordPress Theme?
All done! Your theme was created and works correctly with the links that direct the user to an exclusive page for each post. In addition, you have already added the header, footer, and stylesheet for your custom theme.
However, you must still add other requirements to your page so that the template has unique characteristics. Many people believe that the theme’s functionality is exclusively aesthetic but it also has a huge impact on a website’s performance.
To perform these customizations, it’s necessary to use hooks — pieces of code inserted in template files, such as index.php or functions.php —, which allow you to execute PHP actions in different areas of a website, add styles, and display other information.
Most hooks are implemented directly in the WordPress core but some are also useful for theme developers. The hook “after_setup_theme”, for example, activates the highlighted images (thumbnails) for each post, adds a logo for the website, and menus in header.php and footer.php. There are also other hooks, as described below:
- wp_head — added to the <head> element in header.php, enables styles, scripts, and other information that are executed as soon as the site is loaded;
- wp_footer — added to footer.php just before the </body> tag, so that Google Analytics information can be added, for example;
- wp_meta — included in sidebar.php, to add scripts, such as a tag cloud;
- comment_form — added into comments.php before </div> (closing tag of the file) to display the page comments.
Final Words
In this tutorial, you learned the basics of how to create a WordPress theme. As the website design is also important, especially for corporate applications, you can add lines of ready-made template codes in Bootstrap, which can facilitate the process of adding new features and functionality to your page.
And now that you know how to develop your own WordPress theme, what about getting some knowledge on how to create a corporate blog for your business? Download our free ebook!